Laser8 Laser Projector
A laser projector we built to improve how cars communicate with each other and with pedestrians. We officially named it "Laser8" at our launch event.

'%3e%3crect%20x='0'%20y='0'%20width='240'%20height='60'%20fill='%23FFD23F'%20fill-opacity='.8'/%3e%3crect%20x='0'%20y='0'%20width='240'%20height='60'%20fill='url(%23washi-yellow-p)'%20fill-opacity='1'/%3e%3crect%20x='0'%20y='0'%20width='240'%20height='60'%20fill='url(%23washi-yellow-sheen)'/%3e%3cpath%20d='M0%20.6H240'%20stroke='%23fff'%20stroke-opacity='.45'%20stroke-width='1.2'/%3e%3cpath%20d='M0%2059.4H240'%20stroke='%23F2B91A'%20stroke-opacity='.35'%20stroke-width='1.2'/%3e%3cpath%20d='M5.0%200.0%20L234.8%200%20L232.1%202.2%20L235.0%204.4%20L232.1%206.5%20L235.8%208.5%20L231.9%2010.5%20L237.0%2012.5%20L232.1%2014.3%20L234.6%2016.1%20L231.8%2017.8%20L237.5%2019.5%20L231.6%2022.1%20L234.9%2024.6%20L229.8%2026.8%20L236.6%2028.9%20L230.5%2030.7%20L235.2%2032.6%20L230.5%2034.3%20L234.5%2036.1%20L230.2%2038.3%20L235.3%2040.5%20L230.9%2043.0%20L235.3%2045.6%20L232.1%2047.6%20L235.0%2049.6%20L231.4%2051.2%20L236.8%2052.9%20L230.1%2054.8%20L235.6%2056.8%20L231.7%2059.4%20L236.6%2060.0%20L3.1%2060.0%20L9.8%2059.2%20L4.8%2057.4%20L7.6%2055.0%20L4.9%2052.5%20L8.5%2050.4%20L3.8%2048.3%20L10.3%2046.3%20L5.1%2044.2%20L8.0%2041.8%20L4.4%2039.4%20L7.8%2036.8%20L4.0%2034.3%20L7.6%2032.4%20L3.7%2030.4%20L9.7%2028.0%20L2.5%2025.5%20L8.2%2023.8%20L4.8%2022.2%20L7.7%2019.8%20L3.7%2017.4%20L7.5%2015.4%20L4.8%2013.5%20L9.0%2011.4%20L3.1%209.3%20L8.1%206.9%20L4.1%204.5%20L9.6%202.2Z'%20fill='none'%20stroke='%23fff'%20stroke-opacity='.35'%20stroke-width='1.6'/%3e%3c/g%3e%3c/svg%3e)
'%3e%3crect%20x='0'%20y='0'%20width='240'%20height='60'%20fill='%232EC4B6'%20fill-opacity='.8'/%3e%3crect%20x='0'%20y='0'%20width='240'%20height='60'%20fill='url(%23washi-mint-p)'%20fill-opacity='.75'/%3e%3crect%20x='0'%20y='0'%20width='240'%20height='60'%20fill='url(%23washi-mint-sheen)'/%3e%3cpath%20d='M0%20.6H240'%20stroke='%23fff'%20stroke-opacity='.45'%20stroke-width='1.2'/%3e%3cpath%20d='M0%2059.4H240'%20stroke='%231FA396'%20stroke-opacity='.35'%20stroke-width='1.2'/%3e%3cpath%20d='M4.8%200.0%20L236.2%200%20L231.2%202.2%20L235.1%204.4%20L230.1%206.8%20L236.5%209.2%20L232.0%2011.3%20L235.5%2013.4%20L231.8%2016.0%20L237.5%2018.6%20L232.4%2021.0%20L236.3%2023.5%20L231.4%2025.4%20L236.5%2027.2%20L231.1%2029.5%20L236.5%2031.8%20L232.1%2034.2%20L237.4%2036.5%20L229.6%2038.8%20L234.6%2041.0%20L232.5%2042.7%20L237.3%2044.4%20L231.6%2046.4%20L237.2%2048.4%20L231.6%2050.5%20L235.8%2052.7%20L232.3%2054.9%20L237.0%2057.0%20L232.0%2058.9%20L235.2%2060.0%20L4.8%2060.0%20L8.4%2060.0%20L3.6%2060.0%20L10.4%2057.9%20L4.8%2055.9%20L7.8%2054.2%20L2.9%2052.4%20L8.8%2049.9%20L3.1%2047.3%20L10.3%2045.4%20L3.4%2043.4%20L9.7%2040.9%20L4.1%2038.4%20L7.6%2035.9%20L4.6%2033.5%20L9.8%2031.3%20L5.3%2029.1%20L9.7%2026.8%20L3.9%2024.5%20L9.4%2022.1%20L5.0%2019.6%20L8.9%2017.4%20L3.0%2015.1%20L10.5%2013.1%20L4.8%2011.0%20L10.0%209.1%20L5.5%207.3%20L9.4%205.6%20L3.7%203.9%20L9.1%202.0Z'%20fill='none'%20stroke='%23fff'%20stroke-opacity='.35'%20stroke-width='1.6'/%3e%3c/g%3e%3c/svg%3e)
How It Started
While we were trying to figure out what to do for our final-year capstone project, I happened to see someone online who’d built a laser projector out of an old hard drive. Our self-driving campus car was being built at the same time, and it instantly reminded me that all those futuristic concept car videos online seem to have this cool feature where they project images onto the ground. So I pitched the idea of building a laser projector and mounting it on the car to my teammates. Everyone was immediately on board, and we got to work.
Materials
- Old HDDs
- HDD motor controller
- Magnets
- Hall effect sensor
- Laser diodes
- Eight mirrors
- Laser-cutting material
- 3D printing filament
- ESP32
How It Works
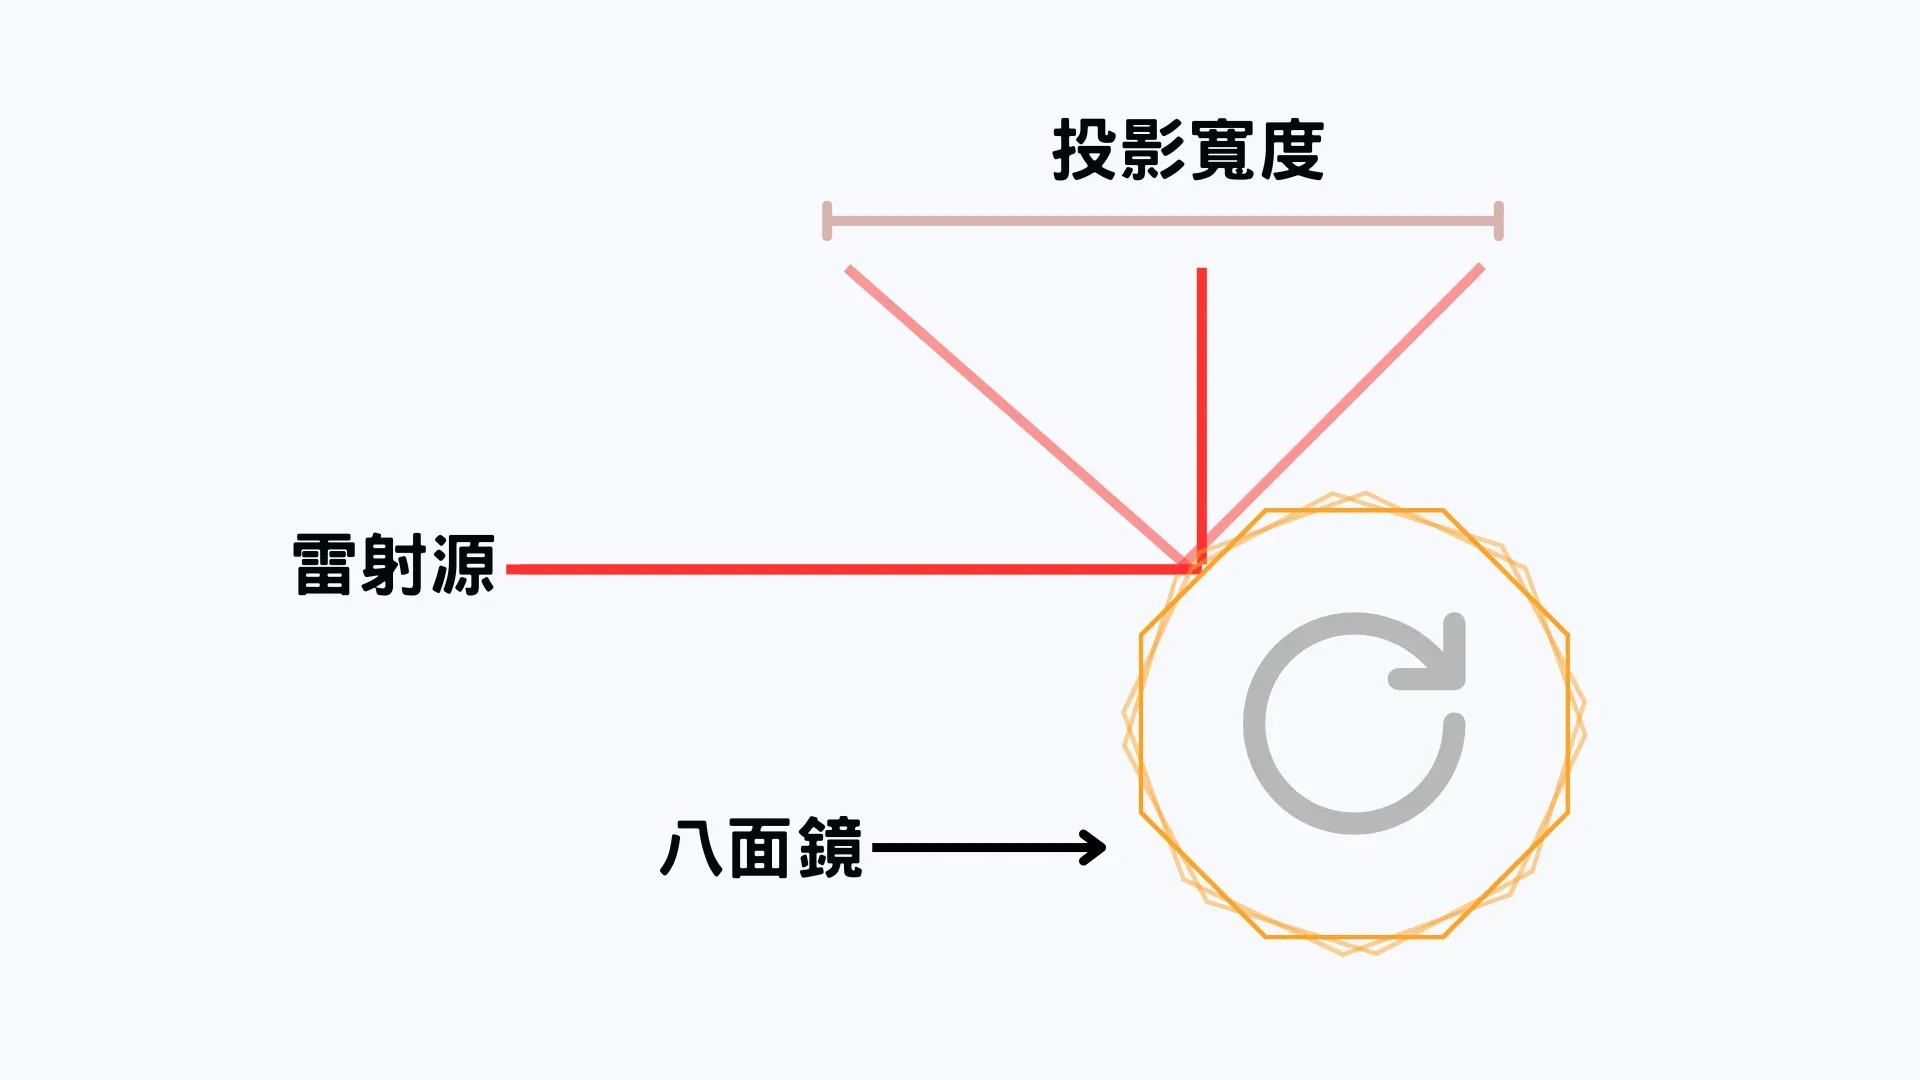
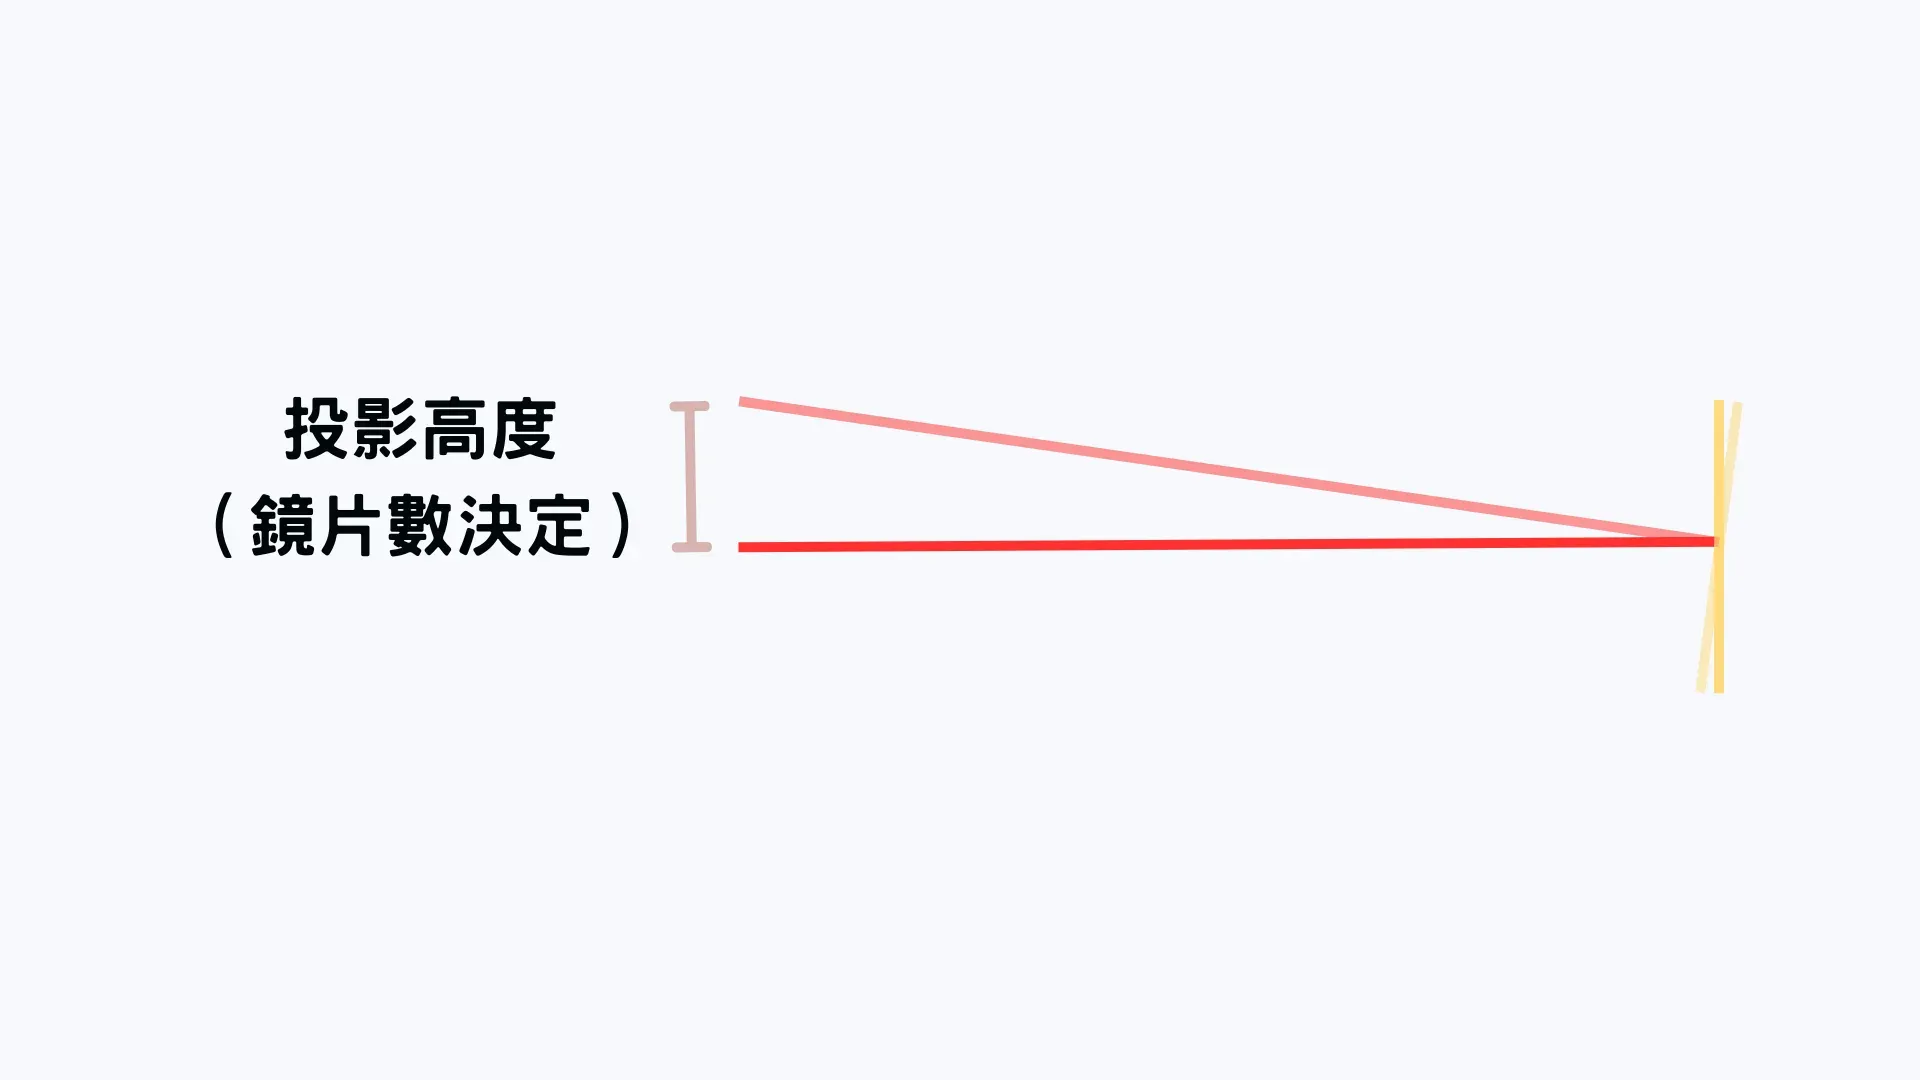
A spinning mirror moves the laser dot so fast that persistence of vision makes it look like a full image. For the X axis, each mirror sweeps the laser across the wall as it rotates through the beam, drawing a horizontal line. For the Y axis, each of the eight mirrors is tilted up by one more degree than the last, so every line lands one degree higher. With 8 mirrors, that gives us 8 rows of pixels on the Y axis. To control the pixels along the X axis, all you need is a microcontroller switching the laser on and off.
For the high-speed spinning part, the plan was to reuse an old hard drive motor. The target was infinity × 8 pixels (the actual X resolution depends on the microcontroller’s clock speed, so in theory it’s unlimited) at around 80 fps.
The Build, Step by Step
- Hunted down old HDDs (found three)
- Tried writing a three-phase motor control program on an Arduino
- Got the Arduino to sort of control the HDD motor (but super unstable)
- Designed the laser-cut mirror mount
- Laser-cut the mount and attached the mirrors
- Realized our homemade HDD controller was really, really unstable
- Bought an off-the-shelf HDD motor controller board online
- Designed mounts for the laser diode and the Hall sensor
- 3D printed the mounts
- Tried using the Hall sensor data to switch the laser on and off to draw an image
- Surprisingly, the code worked on the first try
- Found out the laser diode’s refresh rate was too low
- Swapped the Arduino Uno for an ESP32
- Realized we didn’t have enough rows
- Added a second laser diode
- Discovered the mirrors fly off at high speed
- Built an enclosure
- Used physical buttons and the ESP32’s built-in touch sensing as controls
- Built a fake car door for the demo
- Realized our project didn’t stand out as much as the other teams’
- Not flashy enough? Make up for it with a video. We shamelessly asked the school to borrow the huge bezel-less screen in the activity center
- Shot and edited a super cringey mock product-launch video
- Showed it off at the department’s official project exhibition

Results
Check out the demo video linked below!